Its been a big year for this branch of the MacMurtry tree, which means Holiday cards have been perpetually simmering on the back burner while we worked through my son's hospital admissions last winter, his surgery in the spring, buying our first home and moving in over the summer and back to school with two preschoolers in the house during cold season. Needless to say, its been busy & it would be completely understandable for me to either be stressing about completing my Christmas cards on time, or scrapping the whole idea and buying a box from the store or ordering cute photo cards.
Being a card maker, my soul dies a little bit every time I purchase one of those creased, mass printed pieces of cardstock they call a store bought card, so I really didn't want to go that route, and we don't have any great recent family photos for a photo card.
So, what's a crafty girl to do?
I decided to order a handful of Craft Creations Die Cut Decoupage Sheets from White Rose Crafts. I've created cards with these sheets before--check out my post from earlier this year 14 Cards, 3 Decoupage Sheets
--and I know they produce beautiful results; but most importantly, they assemble quickly and have lots of impact. They're also an incredible value at just $1.50-$1.70 per sheet (depending on which brand you order)--especially since I usually get 2-3 or more cards per sheet.

psst...Use my Coupon Code to save 15% off your total order:
AMBER 15
🎄🎄🎄🎄🎄🎄🎄🎄🎄🎄🎄🎄🎄🎄🎄
This time around, I settled on 8 sheets & I ended up with 16 beautiful cards (I could have made more, but chose to use all of the layers on a single card for a few of the sheets), plus 6 bonus gift tags, that I got to put my own spin on by splitting up the layers to create multiple scenes with each set.
(Well worth the $11.50 if you ask me!
Don't forget to use my coupon to get that price.)
Not to mention,
who doesn't love all of that gorgeous dimension??

Putting these cards together was pretty simple and self explanatory because each sheet is numbered in the correct order to assemble the layers as intended
(my method is slightly higher difficulty, but I usually just alternate even & odd numbers to assemble multiple cards with the same collection of pieces), so I'm not going to do a step by step process description for each card. Instead, I'll give you some pro tips after assembling nearly 20 of these sheets over the past couple of years.
1. I highly recommend using 1mm Foam Mounting Tape to add the layers so that the completed cards can still easily be mailed in a standard envelope with regular postage.
2. Up-cycle that packing material by cutting panels of thin foam sheets 1/4-1/2 inch smaller than your card front and slip it inside the envelope with the card to protect it from being crushed in the mail. Don't have foam sheeting? You can use a piece of thin Fun Foam (available at Dollar Tree) or scrap cardstock, too!
3. Mail the square cards in rectangular envelopes to avoid paying extra postage. I slide a full size, rectangular piece of 110# cardstock into the envelope to keep it from getting damaged in the sorting machines.
4. Pop out the pieces your adhering as you need them, that way you don't get confused as to what order they should be assembled in.
5. Have a selection of background papers and layering pieces pre-cut to the sizes you'll need to make assembly go more quickly. I like to use Kaisercraft Double Sided Tape for assembly.
6. When in doubt, Add Glitter Glue! I love the added shine and interest a little glitter gives when strategically added to areas of a decoupage card, and I love it even more because it doesn't flake off or shed if you use glitter glue! Nuvo Drops also make beautiful, simple embellishments!
Those are my tips to help you make assembling your decoupage cards even less stressful--yup its possible to make them less stressful. Believe it or not, I assembled all of my cards in about 6 hours, and that includes frequent family and feline interruptions.
🎄🎄🎄🎄🎄🎄🎄🎄🎄🎄🎄🎄🎄🎄🎄
Here are my creations, I'll put a supply list with direct links below each photo so you can recreate them for yourself, if you'd like! Rather than take photos of each card, individually, I grouped them together by sheet, so you can see how much bang you really get for your buck!


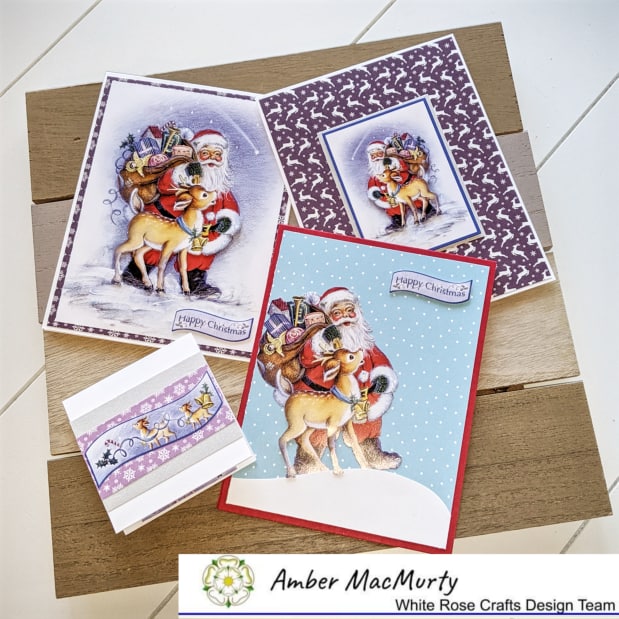

DCWV two tone silver striped glitter paper from my stash

DCWV two tone silver striped glitter paper from my stash
🎄🎄🎄🎄🎄🎄🎄🎄🎄🎄🎄🎄🎄🎄🎄
I hope you've enjoyed my card share today! I encourage you to consider Decoupage Sheets as an option for those last minute holiday cards you've been stressing about!
Or, if you took advantage of the recent Craft Creations sale, I hope my pro tips have given you some ideas of how to stretch your sheets and save money on postage!
Thanks for visiting the blog,
come back soon!
Crafty Hugs,
Amber
No comments:
Post a Comment