Monday, March 18, 2019

White Rose Crafts March Kit Add-Ons Blog Hop

Good Morning Rosies, I am so excited that its time for the March "Blue Skies" Kit Add-Ons Blog Hop.

Image may contain: cloud and text 

If you are not familiar with blog hops, it’s fun and easy way to see what the Rosie Design Team is creating!  Simply click on the first name in the list below to visit our Design Team.  Each blog will have the same list of links on their blogs and you just follow them in order to go to the next blog!


To make this whole experience even more fun, there is a chance for you to win a $15 WRC Gift Card just for hopping along with us and leaving a comment at each stop along the way! How cool is that?

The Hop will run all week until Friday, March 22nd at 12pm EST.  Once the hop has closed, we will randomly pick a winner of someone who has commented all along the way, who will be announced on the 19th right here on the WRC blog!

As an added bonus, you could have the chance to have your work be featured on our blog when we announce our hop winner!  Share your White Rose Crafts projects over on our Facebook Gallery, and you might just be a featured project right here!

~~~~~~~~~~~~~~~~

Now onto the our Hop...

Have you seen our March "Blue Skies" Subscription Kit?  There are only a few left in stock, so don't miss out on a chance to own your own bit of Festive Winter Elegance.  But did you know that with each of our kits, there is always an Kit Add-On section of the Store that compliments your Monthly Subscription Kit?  And did you know you can get anything in that March Kit Add-On section for 10% off using the code March Add Ons!!!

Today our design team is playing around with the vast array of crafting supplies you can find in the March Kit Add-On section of the store--so prepare yourself for lots of fun and a very cool line up of projects these talented ladies have created for your inspiration.

⛅⛅⛅⛅⛅⛅⛅⛅⛅⛅⛅

If you're coming from Esther's blog, then you're in the right place, or you can start at the beginning with our WRC post for some enticing sneak peeks!

~~~~~~~~~~~~~~~

Today I've got a bright and uplifting card to share with you, featuring lots of items included in the kit, plus a couple of extras from the March Kit Add-Ons!

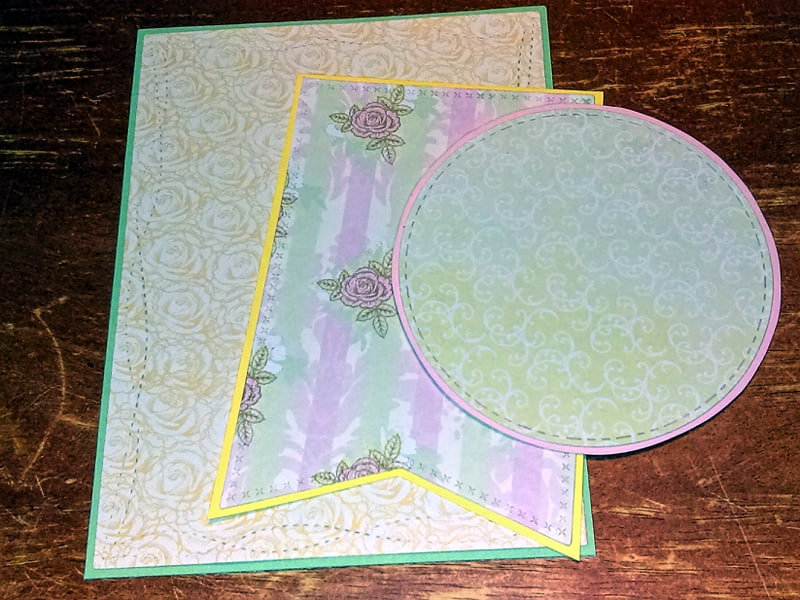
I started by trimming out one of the sweet sentiments from the 6x6 cut aparts sheet in the included paper pack, and cutting pieces from 4 of the other pretty patterns. (measurements: 1 x 3 1/2, 2 x 4, .5 x 3 1/2 & 4 1/4 x 5 3/8 inches, respectfully), and set them aside.


Next, I pulled out an A2 panel of white cardstock from my stash and grabbed the Kaisercraft stamp set from the kit, and a Scrapberry Shimmering Sunny Yellow pigment ink cube, from the Add-Ons section. I chose the Cherry Blossom image from the stamp set, and using my MISTI, I double stamped the image at random all over the white panel, creating my own bright, shimmery patterned paper. I hit the panel with my heat gun to dry and set the ink before I trimmed it down to 4 x 5 /14 inches, and sent it aside. 
(You guys, I can't even begin to tell you how much I love this shimmer pigment ink! It comes in quite a few gorgeous, vibrant colors, has just the right touch of sparkle, and once its dry, the shimmer doesn't rub off, like with some other brands! Plus, you can't beat the price at less than $2.00 each!)


While I had the yellow ink out, I decided to use it with one of the Tsukineko Finger Daubers to ink the edges of the 3 smaller pieces of patterned paper.


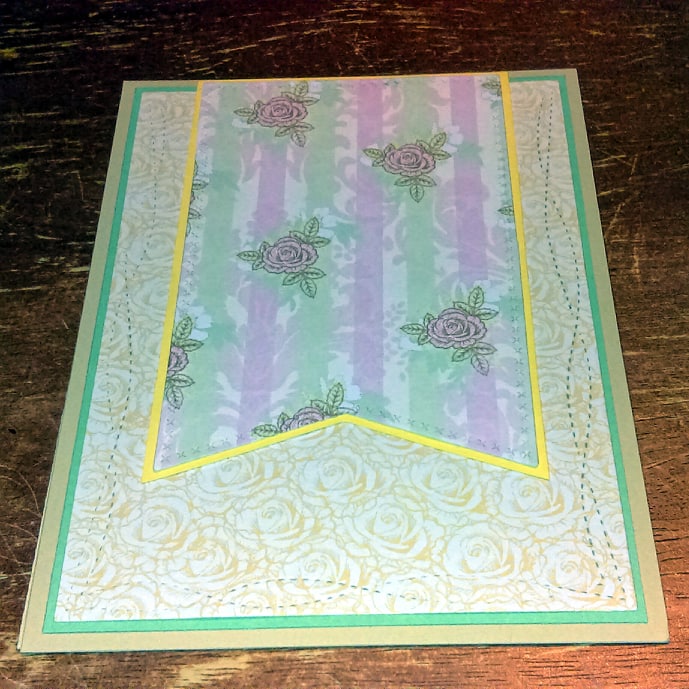
To assemble my card, I started with a golden yellow 110# card base from my stash. I layered my floral stamped panel over the blue paint strokes print from the kit and mounted them centered on the card base. Next I adhered my small patterned paper pieces, arranging them in a cute cluster just north of the center of the card, using Kaisercraft 1/4 inch double sided tape


I grabbed one of the blue flower buttons from the kit and slipped a piece of Jilibean Soup yellow baker's twine through the holes, tying a cute knot and adhered it to the top left corner of the cluster. I used that same twine to tie around the top edge of the card, just below the fold, and tie a little bow.Then I added a few of the sequins from the exclusive "Sunny Skies" Sparkle Blend, also included in the kit, scattered around for a little extra bling. 

I hope you enjoyed my card today! I really love how it turned out and hope it gave you some inspiration! Don't forget to leave me some comment love for a chance to win a $15.00 e-gift card to the White Rose Crafts store. 

You can save 15% on your total order by using code: 
AMBER 15
This is an affiliate discount code, meaning I will receive a small percentage of the sale, at no extra cost to you. 

Your next stop along the hop is Alison!

⛅⛅⛅⛅⛅⛅⛅⛅⛅⛅⛅


                   Amber <--- You Are Here


Once you're all done hopping, head on back over to the WRC post and leave a comment letting the team know
which Add-On you are most excited to play with!

~~~~~~~~~~~~~~~

Thank you for visiting the blog today.
I hope you'll come back soon,
Happy Crafting!

Friday, March 15, 2019

You Brighten My Day with Jilibean Soup & White Rose Crafts

Hello there, Rosies! I'm sharing a fun Shaker card project for Jillibean Soup week over at White Rose Crafts! I absolutely love the Jillibean Soup Shaker line of products (there's a surprise, right?) and was super excited to see that the March "Blue Skies" kit included one of the Cloud die cut shaker cards and matching PVC pouches--so I decided to grab those, the pretty, ombre cloud patterned paper, the exclusive Sunny Skies Sparkle Blend and Bright Blue Scrapberry pigment ink cube from the kit for my project today. To round out my supplies, I also grabbed the Jillibean Soup My Sunshine stamps & Cloud Shaker Dies, Shimmering Azure, Shimmering Yellow & Shimmering White pigment ink cubes from Scrapberry, and Tsukineko Finger Daubers.


I started by trimming the patterned paper from the kit to about 1/2 inch larger than the Cloud card base (so I didn't have to worry about placement being absolutely perfect), and die cutting it using the larger of the two cloud dies from the Jillibean Soup set. 


I adhered it to the front of the card panel using Zig 2 Way Glue, so I had a chance to move it around a bit and line it up with the cut out in the card. Then I trimmed off the extra paper overhanging the the card base with scissors.

Next, I cut three small clouds. from the leftover scrap of patterned paper, inking the edges of those, the larger die cut from the panel & the edges of the card panel with Shimmer Azure and Bright Blue ink, and adding an all over shimmer to the clouds with Shimmer White using a Sponge Dauber. 


Using the solid sun image from the My Sunshine stamp set, I added a small sun, stamped directly on the patterned paper, with Shimmer Yellow ink, stamping it several times with my MISTI to get a nice, bright, opaque image--then filled it in with Shimer White--& stamped one of the uplifting sentiments from the set in the bottom left of the card panel with Bright Blue ink. 


Then I took a 4x5.25 inch panel of white cardstock and inked up just enough of an area for the background of my shaker, using the same 3 inks. I dried it with my heat tool & then added Kaisercraft Double Sided 1/4 inch tape before filling my shaker with the "Sunny Skies" Sparkle Blend, included in the kit, and adding the panel to the inside cover of my card to seal everything inside. 


Then I began adhering my clouds to the panel with 1-3 layers of Woodware 1mm Foam Mounting Tape, to give dimension. I decided the sun blended into the background a bit too much, so I outlined it with a black pen. For a little bit more sparkle, I added a scattering of individual sequins from the Sparkle Blend. 


To bring the design to the inside of my card, I pulled in a sentiment from a second Jillibean Soup stamp set, called Sunshine, and then added some of the images from both sets using the Scrapberry Inks

~~~~~~~~~~~~~~~

I hope you've enjoyed my card today, and were inspired to create something beautiful. If you're interested in owning the March Card Kit, you check out our more detailed blog post and find a link to the unboxing video, HERE, but you better hurry! There are only 2 kits left as of writing this post!

I encourage you to check out the Jillibean Soup line of products. They have great, inexpensive stamps, dies and embellishments that all coordinate together, beautifully--and check out all of the other inspiring projects the other WRC design team members have been sharing all week!

If you'd like to place an order, and help support more content here on the blog, you can save 15% on your total order with my affiliate code:

AMBER 15

I will receive comission in the form of a small percentage of the sale, at no additional cost to you. 

~~~~~~~~~~~~~~~

Thank you for visiting the blog! 
Have an inspiring day, come back soon,
and Happy Crafting!

Friday, March 8, 2019

4 Cute Cards for the White Rose Crafts March Sketch Challenge

Good morning! I've got 4 adorable Spring and Easter cards  created with a variety of fabulous products from White Rose Crafts using our March Sketch Challenge! I created all 4 cards using exactly the same method, so I'll only share process pictures for one, but I hope you find some inspiration in these cute cards! 

Stay tuned to the very end for a special, exclusive discount code!

~~~~~~~~~~~~~~~

For my first card I selected the adorable critters from the aptly named Little Acres Creations Stinkin Cute stamp set; stamping them each once in alcohol marker friendly, Memento Tuxedo Black ink, colored them in and fussy cut them with scissors, right on the outline. I also chose 3 sheets of patterned paper from the Butterfly Garden and Peach Blossom 6x6 paper packs from Wild Rose Studio. I cut the yellow rose print with a wonky stitched rectangle die, the pink and green rose stripe print with a cross stitched fish tail banner die--using some strategic partial die cutting to make the banner longer--and the green swirl print with a stitched circle die. Next, I cut panels of coordinating card stock, also from my stash, 1/8 inch larger than the die cuts, as mat layers.


I adhered the die cuts to their respective mats using Kaisercraft 1/4 inch Double Sided Tape


Then I assembled the layers, also with double sided tape.


Now it was time to create my little scene, so I adhered the pony & super cute goat flat to the card with Zig 2 Way Glue Pen, and then popped up that precious lamb on Woodware UK 1mm Foam Mounting Tape. I decided the card needed just a touch more color, so I decided to add two of the chick images from the stamp set. At this point, I knew I wanted this to be a spring card, so I decided to grab the "Happy Spring" sentiment and tiny butterfly from Little Acres' Pigments of Imagination set, stamping them with Versafine Clair Nocturne ink. I colored the butterfly with a dusty pink Copic marker.
On a side note, I can't recommend these inks enough. They dry quickly with no smudge, and I get beautiful, clear, full coverage stamped images the first time, every time!


For one final, sweet touch, I added just a few sequins from the Doodles Paper PlaygroundBubblegum Ice Sparkle Blend. 


You know how I always like to bring the design to the inside of my cards, so I decided to stamp the lamb image again, and another of the cute Chick images in the bottom left corner, using Versafine Clair Morning Mist ink on a straw colored 110#, top folding A2 card base.


As the final touch, I added a sentiment from the pigments of imagination stamps, reading "May the sun always shine brightly on you!)

~~~~~~~~~~~~~~~
For my second card, I followed the same assembly steps, but I chose to use a final set from Little Acres Creations, called Momma's Flock, a selection of patterns from Lemoncraft's Fresh Summer collection and a few sequins from the Conversation Hearts Sparkle Blend, and a cute "Happy Easter" sentiment from the Honey Bunny Boo Stamps by Heffy Doodle. I also did something slightly different for this card & stamped the fun chicken wire fence image from Momma's Flock right onto the pink die cut circle, to add some extra interest to the background.


On the inside, I again stamped the mama bird image in Morning Mist, Clair ink, and the punny "from our nest to yours, in Nocturne Ink,  from the Eggcellent News stamp set. 


~~~~~~~~~~~~~~~

For my third card, I chose to use the ultra adorable Sprinkles: Happy Easter  stamp set by Your Next Stamp, adding a chick image from Eggcellent News and a couple of eggs and a carrot from Honey Bunny Boo. I also decided to use the Your Next Stamp, Happy Spring 6x6 paper pack and some cute yellow plaid from Lawn Fawn's Perfectly Plaid: Spring pack. Finally, I chose a simple little "Happy Easter" sentiment from Lawn Fawn's Some Bunny stamp set and embellished with a few sequins from the Spring Fling Sparkle Blends.


I followed the same idea for the inside of my card, adding images in Morning Mist ink and the "You're eggstra special" sentiment in Nocturne ink. 


~~~~~~~~~~~~~~~

For my final card, I chose papers from Wild Rose Studio's Dancing Daisies 6x6 paper pack and the super adorable bunnies from Heffy Doodle's Honey Bunny Boo stamp set, and a sentiment stamp from the Your Next Stamp Sprinkles: Happy Easter set.
To embellish, I added a few sequins from the Gingerbread Man: Sparkle Blends


On the inside, I added some images from both sets and a punny little sentiment to finish things off.


~~~~~~~~~~~~~~~

I hope you've enjoyed my cards today. I love that this simple sketch can be used to create a wide variety of cards. If you missed my previous Shaker Card project featuring this Challenge sketch and would like some more inspiration, you can check out that post HERE!


I've got a special affiliate coupon code for you today! You can save 15% off your total White Rose Crafts order by using coupon code: 
AMBER 15

This is an affiliate coupon code, meaning that when it is used, I receive a small percentage of the sale, at no additional cost to you.

~~~~~~~~~~~~~~~

Thanks for visiting the blog today!
Come back soon,
Happy Crafting!

4 Spring/Easter Cards for White Rose Crafts March Sketch Challenge

Today I'm sharing 4 adorable Spring and Easter cards  created with a variety of fabulous products from White Rose Crafts using our March Sketch Challenge! I created all 4 cards using exactly the same method, so I'll only share process pictures for one, but I hope you find some inspiration in these cute cards! 

Stay tuned to the very end for a special, exclusive discount code!

~~~~~~~~~~~~~~~

For my first card I selected the adorable critters from the aptly named Little Acres Creations Stinkin Cute stamp set; stamping them each once in alcohol marker friendly, Memento Tuxedo Black ink, colored them in and fussy cut them with scissors, right on the outline. I also chose 3 sheets of patterned paper from the Butterfly Garden and Peach Blossom 6x6 paper packs from Wild Rose Studio. I cut the yellow rose print with a wonky stitched rectangle die, the pink and green rose stripe print with a cross stitched fish tail banner die--using some strategic partial die cutting to make the banner longer--and the green swirl print with a stitched circle die. Next, I cut panels of coordinating card stock, also from my stash, 1/8 inch larger than the die cuts, as mat layers.


I adhered the die cuts to their respective mats using Kaisercraft 1/4 inch Double Sided Tape


Then I assembled the layers, also with double sided tape.


Now it was time to create my little scene, so I adhered the pony & super cute goat flat to the card with Zig 2 Way Glue Pen, and then popped up that precious lamb on Woodware UK 1mm Foam Mounting Tape. I decided the card needed just a touch more color, so I decided to add two of the chick images from the stamp set. At this point, I knew I wanted this to be a spring card, so I decided to grab the "Happy Spring" sentiment and tiny butterfly from Little Acres' Pigments of Imagination set, stamping them with Versafine Clair Nocturne ink. I colored the butterfly with a dusty pink Copic marker.
On a side note, I can't recommend these inks enough. They dry quickly with no smudge, and I get beautiful, clear, full coverage stamped images the first time, every time!


For one final, sweet touch, I added just a few sequins from the Doodles Paper PlaygroundBubblegum Ice Sparkle Blend. 


You know how I always like to bring the design to the inside of my cards, so I decided to stamp the lamb image again, and another of the cute Chick images in the bottom left corner, using Versafine Clair Morning Mist ink on a straw colored 110#, top folding A2 card base.


As the final touch, I added a sentiment from the pigments of imagination stamps, reading "May the sun always shine brightly on you!)

~~~~~~~~~~~~~~~
For my second card, I followed the same assembly steps, but I chose to use a final set from Little Acres Creations, called Momma's Flock, a selection of patterns from Lemoncraft's Fresh Summer collection and a few sequins from the Conversation Hearts Sparkle Blend, and a cute "Happy Easter" sentiment from the Honey Bunny Boo Stamps by Heffy Doodle. I also did something slightly different for this card & stamped the fun chicken wire fence image from Momma's Flock right onto the pink die cut circle, to add some extra interest to the background.


On the inside, I again stamped the mama bird image in Morning Mist, Clair ink, and the punny "from our nest to yours, in Nocturne Ink,  from the Eggcellent News stamp set. 


~~~~~~~~~~~~~~~

For my third card, I chose to use the ultra adorable Sprinkles: Happy Easter  stamp set by Your Next Stamp, adding a chick image from Eggcellent News and a couple of eggs and a carrot from Honey Bunny Boo. I also decided to use the Your Next Stamp, Happy Spring 6x6 paper pack and some cute yellow plaid from Lawn Fawn's Perfectly Plaid: Spring pack. Finally, I chose a simple little "Happy Easter" sentiment from Lawn Fawn's Some Bunny stamp set and embellished with a few sequins from the Spring Fling Sparkle Blends.


I followed the same idea for the inside of my card, adding images in Morning Mist ink and the "You're eggstra special" sentiment in Nocturne ink. 


~~~~~~~~~~~~~~~

For my final card, I chose papers from Wild Rose Studio's Dancing Daisies 6x6 paper pack and the super adorable bunnies from Heffy Doodle's Honey Bunny Boo stamp set, and a sentiment stamp from the Your Next Stamp Sprinkles: Happy Easter set.
To embellish, I added a few sequins from the Gingerbread Man: Sparkle Blends


On the inside, I added some images from both sets and a punny little sentiment to finish things off.


~~~~~~~~~~~~~~~

I hope you've enjoyed my cards today. I love that this simple sketch can be used to create a wide variety of cards. If you missed my previous Shaker Card project featuring this Challenge sketch and would like some more inspiration, you can check out that post HERE! Enter our challenge for yourself by creating a new project with this sketch and uploading it to the challenge album in the White Rose Crafts Gallery, for a chance to win a $15.00 store credit. 


~~~~~~~~~~~~~~~

Thanks for visiting!
Happy Crafting!

Friday, March 1, 2019

White Rose Crafts March Sketch Challenge

Its the first of the month, and that means a brand new Sketch Challenge over at White Rose Crafts--and a new sketch challenge means a new chance to win a $15.00 e-gift card to the store!

To kick things off, I've got a sweet shaker to share with you today, featuring this great sketch!

~~~~~~~~~~~~~~~~


I started by pulling out the extra fun and super sweet Ice Cream Parfait stamp set from Woodware UK and my Copic markers (which I haven't touched in far too long!). I made the mistake of not thinking about my color palate before I got started, and happened to luck out that I had ordered the two Sunset & Sunrise plaid & polka dot paper packs by Pink & Main with my last order, because they worked perfectly with my odd color choices. I also realized it has been a LONG time since I created a shaker card--which, if you know me (and the fact that I own Doodles Paper Playground: Sparkle Blends), you know that's kindof cray cray! Long story short, I decided this sketch would be perfect for a simple, circle shaker.


I began by coloring up the 3 ice cream images, umbrella and straw from the stamp set with my copics and fussy cutting them right on the outline. Then I assembled my shaker by cutting a 2.5 inch background circle from a piece of blue violet, watercolor print paper from the Wild Rose Studio Festive Florals paper pack & stamped the "Stressed spelt backwards is desserts" sentiment from the stamp set in Versafine Clair Nocturne ink. Next, I cut 9 stitched circle frames from 110# white cardstock, which I adhered together with Zig 2 Way Glue pen on top of the background circle into a nice, thick shaker box. I cut a final frame out of one of the pretty purple and blue plaid designs from the Sunset paper pack, and a circle of clear Judikins Window Plastic. I selected the Doodles Paper Playground Juniper Berries Sparkle Blend, and added about half a teaspoon to the shaker box, before adhering the acetate and plaid frame with Kaisercraft 1/4 inch Double Sided Tape to complete the shaker.


I chose a cornflower blue, top folding card base from my stash, and then cut a 4x5.25 panel of chunky plaid print paper from the Sunrise paper pack using a wonky stitched rectangle die from my stash. Next, I cut a large X stitched fishtail banner out of purple polka dot paper from the Sunset paper pack, layering it onto a piece of white cardstock and trimming it out with scissors, so it had a 1/16 inch border.


I began assembling my card by mounting the pink and yellow plaid panel, centered on the blue card base, and the fishtail banner, centered horizontally and flush with the top fold of the card, using double sided tape. 


I added the finished shaker to the center, top third of the card usinga a combination of doubles sided tape and Zig 2 Way Glue Pen. 


Using a kraft knife, I cut slits in the yellow and blue ice cream image to insert the straw and umbrella through, so they appear to come out of the ice cream. Next, I adhered all 3 images, in an eye pleasing triangle formation, using 2 Way Glue Pen and glue dots from my stash. 


I wanted to give a touch of sparkle and shine to my colored images, so I added a generous wash of Wink of Stella clear shimmer pen to the chocolate sauce, blue and yellow sunday cup and black raspberry ice cream. Finally, I gave the chocolate sauce, sundae cups, sprinkles and cherry a coating of Glossy Accents for lots of gorgeous shine. 

I love to continue the design on the inside of my cards, whenever possible, so I added two of the cute ice cream images in one corner and a scattering of stamped sprinkles using Versafine Clair Monarch ink to finish off the card. 

~~~~~~~~~~~~~~~~
Other Products Used:


~~~~~~~~~~~~~~~

Thank you for checking out my blog today. I hope you enjoyed reading this process post & were inspired to use this sketch and create a fun project of your own! If you would like to join in the fun for the White Rose Crafts March Sketch Challenge, and all of the subsequent monthly challenges (plus tons of other fun activites and conversations), make sure you join the White Rose Crafts Gallery group on Facebook!

Thanks for stopping by,
come back soon!
Happy Crafting!