
Hello Parent Friends!
This is the second installment of Kid Card Kits. This round's theme is Farm (I know that for some parents, this is the first kit your kids have received, but its actually the second round I've sent out 😊). This time, I've decided to give two different idea options of how the kit can be assembled, which I think will be fun for families with multiple children--OR, you can come up with your own design! If you do, I'd love to see a photo!

I do want to apologize for the long delay in getting these kits mailed. We have had a trying couple of weeks with the kids as well as my sister having her final exams for her 2nd term of Nursing School & the kits had to be put on the back burner--I'm sure you all understand. We're all in this together!
Again, feel free to PM me on Facebook if you have any questions about the photo tutorial. I'm happy to help!
I would love it if your kiddos sent their creations on to a loved one who might need some cheering up, so I've included envelopes with cute stamped critters for them to color!
HAVE FUN!
✀✄✄✄✄✄✄✄✄✄✄✄✄✀
Hello (again) New Card Maker!
I have created a Farm Themed card kit for you to assemble! Enjoy your crafty time!
1- 4 1/4 x 5 1/2 inch White Card Base with stamped sentiment inside.
1- 3 7/8 x 5 1/8 inch patterned background paper rectangle

KIT CONTENTS:
1- White Envelope with coordinating stamped design (for coloring!)
1- 4 1/4 x 5 1/2 inch White Card Base with stamped sentiment inside.
1- 3 7/8 x 5 1/8 inch patterned background paper rectangle
1 - 2 1/4 x 3 1/2 inch patterned rectangle
1 - 1 1/4 x 5 1/8 inch patterned rectangle strip
1 - skinny patterned paper strip
1 - die cut farm animal or image rectangle
1 - die cut sentiment bubble or strip
3 - self adhesive solid color, bumpy rhinestones (one of 3 colors: Blue, Yellow or Purple)
You Will Need: Crayons, Colored Pencils or Water Based Markers (not provided)

Note: All pieces intended to be adhered already have double sided tape or foam mounting tape on the back. All you have to do is peel and stick! Easy Peasy!
INSTRUCTIONS:
Step 1:
Select the Background panel (3 7/8 x 5 1/8 inch patterned rectangle) and flip it over. You will see 3 pieces of double sided tape. Completely remove the one in the middle & discard the backing strip. Peel the first 1/3 of the backing paper off the other two strips of double sided tape, starting from opposite corners. Fold the backing strips at a 90 degree angle, outside of the paper as shown below.


Step 2:
Grab your card base (open it to make sure its right side up and the sentiment is in the right spot)

Next, flip over your background panel onto the front of the white card base. Line it up so its as close to the center as you can. When you get it where you want it, press down on only the center to adhere the uncovered tape strip, like this.


Next, flip over your background panel onto the front of the white card base. Line it up so its as close to the center as you can. When you get it where you want it, press down on only the center to adhere the uncovered tape strip, like this.

Step 3:
Using one hand to make sure your background doesn't move, grab the "tail" of the tape backing paper with your other hand and gently peel in the direction of the fold (I find that doing this toward me is the easiest way). Repeat on the other side. Press down your panel to make sure all three tape strips stick well.


Step 5:
Grab your the tall, skinny patterned strip (1 1/4 x 5 1/8 inch) & Using the same peel and fold technique, prepare the tape so it looks like the photo below, making sure there is only exposed adhesive on the top edge.


Step 6:
Grab your card base (again, checking to make sure it's right side up) and flip the strip over, lining it up with the top center of the background layer. When you have it where you want it, press down gently on the edge with exposed adhesive to tack it down, then you should be able to adjust the angle so the strip runs vertically (the up and down way) up the center of the card, as straight as you can get it. It should look like this.


Step 7:
Use one hand to hold the strip in place and the other to grab the "tails" of the tape backing strips again and gently peel in the direction of the fold, just like in the last step.
Once both backing paper strips have been removed, firmly press the strip down to make sure it sticks well.
Step 8:
Grab the smaller patterned paper rectangle (2 1/4 x 3 1/2 inches). Again, flip it over and prepare the tape at the back with the "peel & fold" techinique, just like with the first background panel, leaving tape exposed in two opposite corners, like this.


Step 9:
Flip the rectangle over and place it as close to the center of the card panel as you can. When you get it where you want it, press down in the center to adhere the exposed tape strip, then gently remove the backing strips, once again & press down firmly to make sure it sticks well.


Step 10:
Take the skinny patterned paper strip & peel the backing off one end, using the same folding technique. Place the strip horizontally (side to side) in the center of the panel, lining the sticky end up with the very edge of the background panel. Press down gently on that edge to tack it down, then line up the other edge before gently peeling off the backing paper and pressing firmly to adhere the strip, like this.

Step 11:
Grab your die cut Animal image or small Rectangle Image Panel. You will find foam tape on the back of this piece.
Flip the image over and completely peel the backing paper off. Turn the image over and place it in the center of the card panel. Press down firmly.
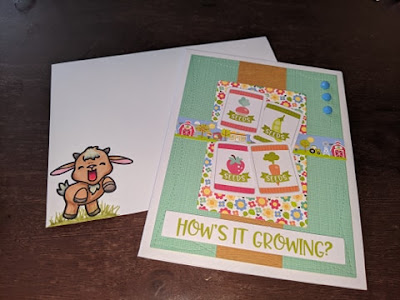
Your card should look something like this.
 Note: I cut my image in half because I didn't like the way it fit the card when full size.

Step 12:
Next, you'll need the sentiment strip or bubble. This will also have foam tape on the back. Peel off the entire backing strip and adhere below the image in the bottom 1/4 of the card, as straight and centered as you can get it. Press firmly to stick it down. Your card should look something like this.


Step 13:
Its time to give your card a little sparkle! Grab the 3 colored rhinestones & place them however you would like. I suggest putting them in a vertical line, about 1/8 inch apart, in the top right corner of your card, like this.


Step 14:
Last step! Grab the envelope and some colored pencils, crayons or markers & color the cute little goat or sheep in the bottom left corner! If you want to get extra fancy, you can draw a little grassy hill underneath him to "ground" the image, like this!
You're finished! Look how great your card turned out!
Who do you think you should send it to?
Does someone you know need an extra smile?
Why don't you ask your mom or dad to help you address your envelope and mail it out to someone special!
✀✄✄✄✄✄✄✄✄✄✄✄✄✀
BONUS DESIGN!

You're finished! Look how great your card turned out!
Who do you think you should send it to?
Does someone you know need an extra smile?
Why don't you ask your mom or dad to help you address your envelope and mail it out to someone special!
✀✄✄✄✄✄✄✄✄✄✄✄✄✀
BONUS DESIGN!
Step 1:
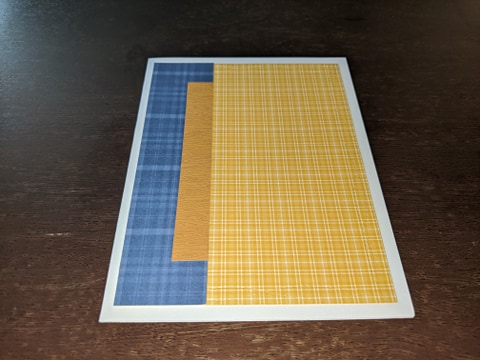
Select the Background panel (3 7/8 x 5 1/8 inch patterned rectangle) and flip it over. You will see 3 pieces of double sided tape. Completely remove the one in the middle & discard the backing strip. Peel the first 1/3 of the backing paper off the other two strips of double sided tape, starting from opposite corners. Fold the backing strips at a 90 degree angle, outside of the paper as shown below.


Step 2:
Grab your card base (open it to make sure its right side up and the sentiment is in the right spot)

Next, flip over your background panel onto the front of the white card base. Line it up so its as close to the center as you can. When you get it where you want it, press down on only the center to adhere the uncovered tape strip, like this.

Next, flip over your background panel onto the front of the white card base. Line it up so its as close to the center as you can. When you get it where you want it, press down on only the center to adhere the uncovered tape strip, like this.
Step 3:
Using one hand to make sure your background doesn't move, grab the "tail" of the tape backing paper with your other hand and gently peel in the direction of the fold (I find that doing this toward me is the easiest way). Repeat on the other side. Press down your panel to make sure all three tape strips stick well. It should look like the 2nd picture.


Step 5:
Grab your the tall, skinny patterned strip (1 1/4 x 5 1/8 inch) & Using the same peel and fold technique, prepare the tape so it looks like the photo below, making sure there is only exposed adhesive on the top edge.
Step 6:
Flip over the strip and line up the sticky part of the tape in the top left corner of the background paper, carefully lining it up with the left edge. Press down on the top edge & then carefully remove the backing papers, one at a time. Press firmly to adhere.


Step 7:
Grab the skinny patterned strip, and peel the backing paper off one end & fold the tail. Now, flip it over and place it along the inner edge of the edge strip, centered vertically (up and down). Press down the exposed tape & gently remove the rest of the backing paper before pressing firmly to adhere well. Your card should look something like this.

Step 8:
Grab the smaller patterned paper rectangle (2 1/4 x 3 1/2 inches). Again, flip it over and prepare the tape at the back with the "peel & fold" techinique, just like with the first background panel, leaving tape exposed in two opposite corners, like this.
Step 9:
Flip the rectangle over and place it as close to the center of your card as you can get it, making sure to leave some of the skinny strip visible along the left side. Press down in the center and then carefully peel off the backing strips. Press firmly to stick well. Your card should now look like this.


Step 10:
Now its time to grab your die cut animal or image rectangle. Flip it over and completely remove the backing from the foam tape. Now place it in the bottom 2/3 of the middle rectangle, centering it horizontally (side to side), like this.


Step 11:
Its time to add the sentiment! Turn over the sentiment strip or bubble & peel the backing off the foam tape. Turn it back over and place it above your image, overlapping the corner of the smaller rectangle, offset to the right, like this.


Step 12:
We need some bling on our cards, don't we? Take your 3 colored rhinestones & put them wherever you want! I suggest placing them in a vertical line (up & down), about 1/8 inch apart in the top left corner, creating a visual triangle with our embellishments (image, sentiment, jewels), which is pleasing to the eye, like this.


Step 13:
Last but not least, grab your envelope & your choice of colored pencils, crayons or markers & color in the little goat or sheep in the bottom corner. If you want to make it look like a little scene, you can add a grassy hill beneath your critter, like this.

You're all done & you made an awesome card! Congratulations! Time to have Mom or Dad help you address the envelope & mail it to someone special!
Who do you think you're going to mail your card to?
✀✄✄✄✄✄✄✄✄✄✄✄✄✀
✀✄✄✄✄✄✄✄✄✄✄✄✄✀

You're all done & you made an awesome card! Congratulations! Time to have Mom or Dad help you address the envelope & mail it to someone special!
Who do you think you're going to mail your card to?
✀✄✄✄✄✄✄✄✄✄✄✄✄✀
Thank you for joining me for


I hope you had fun putting your card together!
I may do another round of card kits, if I do, I'll contact your parents and let them know :-)
I may do another round of card kits, if I do, I'll contact your parents and let them know :-)
Crafty Hugs,
Amber
✀✄✄✄✄✄✄✄✄✄✄✄✄✀
Important Info:
The latest information I've been able to find from the CDC is that Covid-19 survives on cardboard for up to 24 hours, but may survive on some paper surfaces for as little as a few minutes or as long as 5 days, depending on the strain. By the time cards arrive at the recipient's homes, they should be safe to open, but I would suggest telling high risk recipients to leave them somewhere isolated for at least 48 hours before opening, just to be safe, or at the very least, handle them with an abundance of caution & wash hands after opening or handling them.
Disclaimer:
At this time, everyone in our household appears healthy and has had no known exposure to the virus.
All but one of us has been practicing Shelter In Place, voluntarily since the 10th of March & My husband, who is still working outside the home, works in a VT state building with a skeleton crew, but has been distancing himself from the rest of the family when he's home, just to be safe. We also clean and disinfect surfaces at least daily and wash fabric items often, as an added measure.