I'm a bit late to the party for Altair Art week over at White Rose Crafts due to an unexpected hospital admission for my son and a surprise date at the theater from my husband for my birthday, but I'm working on getting back on schedule, and really wanted to share these 3 cards I created with the beautiful Signs of Love paper pack. This is a great blend of basics and detailed floral images, which made it really fun to work with! I think my favorite part is the "belly band" and cover sheet that each have cut-apart images on the backs of them, which is where I got my butterflies and extra flowers to embellish my cards.
🎕🎕🎕🎕🎕🎕🎕🎕🎕🎕🎕🎕
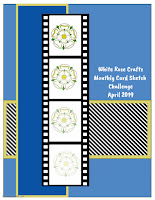
For my first card I knew I wanted to play around with this month's Challenge Sketch, just to get my mojo flowing.
I chose the blue, distressed wood planks print, a soft pink gingham and the teal planks with that gorgeous floral cluster. I trimmed the blue plank paper to 4x5 1/4 inches, the pink gingham to 1 3/4x3 7/8 inches, and the final pattern to 2 1/2x3 3 1/2 inches and matted them all on panels of white cardstock, 1/8 inch larger, to create a small border around the layers and give even more dimension.
I fussy cut the 3 of the big butterflies that went with my color palate from the back of the paper pack's cover sheet and 1 tiny blue one, leaving a little white border to match the layers. Then I assembled the layers using Kaisercraft Double Sided Tape, and added my butterflies to the gingham panel with Woodware 1mm Foam Mounting Tape. Then I stamped my sentiment from the Kaisercraft Ubud Dreams stamp set using Versafine Clair Nocturne ink. Finally, I adhered the whole panel, centered on an Aqua, top folding, A2 card base.
I brought the outside into my my card by taking a 1/4 inch strip of the blue plank paper and adhering it to the left side of the panel, then I added one of the flags from the cut-apart sheet at the top, and a butterfly on top, then stamped a second sentiment from the same stamp set. As a final touch, I added a few Doodles Paper Playground: Sparkle Blends in Diamond, from the Birthstone Collection and some touches of sparkle pen on the butterfly wings and to accent details in the flowers.
🎕🎕🎕🎕🎕🎕🎕🎕🎕🎕🎕🎕
For my second card, I chose to use the plank pattern with floral print with the coordinating blue gingham. I trimmed the floral print to 4x5 1/4 inches, and the gingham to 2x5 1/4 inches, matting them on white cardstock cut 1/8 inch larger than the patterned panels. For a little texture, I brought in a piece of Azalea mulberry paper, adding a line of water with a water brush and tearing it for a tattered, shabby effect. I mounted the floral panel on a pale pink, top folding, A2 card base before adhering the mulberry paper to the inside edge of the gingham panel and adhered it to the right side of the card front.
Next, I cut out another of the banner flags and coordinating flowers from the cut-apart sheet, as well as two of the small, aqua butterflies and adhered them to the gingham panel. In the bottom left corner, I stamped another sentiment from the Ubud Dreams stamp set with Nocturne ink. Finally, added a scatter of sequins from the Diamond Sparkle Blend, and some sparkle pen to the flowers and butterflies, for just the right amount of shine.
🎕🎕🎕🎕🎕🎕🎕🎕🎕🎕🎕🎕
For my final card, I decided to use one of the easter images I colored last month from the Your Next Stamp Sprinkles: Happy Easter stamp set. To go with it, I chose a distressed, pastel blue polka dot pattern and pale orange damask print trimmed to 4 1/8x5 1/4 and 2 1/2x5 1/8 inches, respectively--again mounting them on white cardstock cut 1/8 inch larger for added dimension. I adhered the polkadot panel to a top folding, white A2 card base and the orange strip, centered on top of that.
To create a focal point, I selected a piece of Ivory Mulberry Paper, using a jar as a template to draw a line of water again with my water brush in a circular pattern before tearing it. This created a soft irregularity that I really like. I stamped the sentiment with Nocturne ink on a scrap of white cardstock and mounted it on a scrap of light blue, plank print paper. I adhered the sentiment strip to the card with 1mm Foam Tape. I added the bunny in his carrot car, also with 1mm foam tape and coated it with a generous amount of clear shimmer pen. Then adhered a decorated Easter egg directly to the card with wet glue. For a final little touch, I pulled some of the tiny, 2mm flowers out of the Easter Basket Sparkle Blend, adding just a few to the card for interest.
🎕🎕🎕🎕🎕🎕🎕🎕🎕🎕🎕🎕
I really love how simple and versatile this paper pack is, with just the right romantic, country feel to it. Its a little bit shabby, a little bit country and perfect for really beautiful cards. I hope you saw something that inspired you today, and I encourage you to check out the full line of Altair Art paper over at White Rose Crafts.
You can save 15% off your total order by using coupon code:
AMBER 15
Disclaimer: I receive a small commission on sales using this affiliate coupon code, at no additional cost to you; which helps me continue to fund additional content like this.
🎕🎕🎕🎕🎕🎕🎕🎕🎕🎕🎕🎕
Thanks for visiting the blog today,
please come back soon!
Happy Crafting!


No comments:
Post a Comment