Friday, August 14, 2020

August Doodles Paper Playground August Sparkle Blends Release Inspiration Blog Hop

 Together with the Doodles Paper Playground design team, I am participating in the August Sparkle Blends Release Inspiration Blog Hop! There were 12 amazing new Sparkle Blends in this release & I am so excited to share some of them with you! Make sure you head over to the Sparkle Blends Shop & check out Pizza Party, Kiss A Lot Of Frogs, Pineapple Garden, Watermelon, Use Your Emoji-nation, Wonderland, Flutter By Butterfly, Grown Up Grape Juice, Bee Creative, Baby Shark, Citrus Tornado, & Ladybird. If you act quickly, there even a few discounted Release Bundles left for order that include 2 free gifts & you will receive a pack of Glow In The Dark Bubbles with every order of $10 or more (while supplies last)!

Want a chance to win one of 6 awesome prize packs? Make sure you leave comments on all blog hop posts! Comments must be posted no later than 11:59pm Eastern on Sunday, August 16th 2020. See the Doodles Paper Playground Hop Post for additional prize info, giveaway rules and entry details!
Use Coupon Code: AUG15OFF to take 15% off your total order. (Excludes August Release Bundle. Can not be combined with other coupons or offers. Can not be applied to previous Purchases. Offer ends August 22nd, 2020.)

💎✨🌟🌞💎✨🌟🌞💎✨🌟🌞
Check out the Sneak Peeks below and click the links to hop along! Don't forget to leave that comment love!


                                  Amber  <--- You Are Here


💎✨🌟🌞💎✨🌟🌞💎✨🌟🌞💎
I've got two cute & simple shakers to share with you today featuring a couple of the stamp sets being offered in our Prize Packs!
I love using images from a stamp set to stamp my own backgrounds & I usually go bold and bright and loud--well, today I decided to try some monochromatic and tone on tone designs, to mix things up a bit.
I selected a panel of lemon yellow card stock from my stash & used the Avery Elle "Margarita Shaker Die" set to cut a shaker window & Margarita glass frame from yellow polka dot paper. I loved the little lemon half images from the W Plus 9 "Main Squeeze stamp set, so I used some golden yellow dye ink to stamp a random background pattern.

Next I decided to double stamp this funny sentiment, first in a green dye ink & then using "Nocturne" Versafine Clair ink--just a tiny bit offset, which allows the sentiment to cast a subtle green drop shadow.

Next I built my shaker with the "Citrus Tornado" sparkle blends, using 1/8 inch thick foam tape & Hero Arts Acetate Panels. I added a die cut fruit slice & embellished the rim of the glass & the lemon with iridescent clear glitter glue. Last but not least, I added a few of the elements from the sparkle blends as embellishment.

~~~~~~~~~~~~~~~~~

For my second card, I used the "Flutter By Butterfly" Sparkle Blends & the Clearly Besotted "Bye Bye Butterfly" stamp set (another of our prizes for this hop!) and some Dew Drop ink pads. 

I, again, wanted to achieve a subtle tone on tone background look, so I selected a matching chalk ink from my stash & stamped the larger butterflies in the stamp set, randomly around the background. I also stamped my cute little sentiment & 2 additional butterflies in lavender & pink, respectively. Next I die cut my mini shakers using the Queen & Company "Butterfly" panel die & also cut my shaker box from Fun Foam before assembling the shaker with double sided tape & Hero Arts Acetate panels.
I added as much of the "Flutter By Butterfly" blend into the shaker compartments as I could, while still allowing for movement & closed it up with a piece of aqua polka dot paper before adhering the panel to my card base. I used foam tape to adhere the extra butterflies. Finally, I added 3 little clusters of sequins from the Sparkle Blend to embellish.
💎✨🌟🌞💎✨🌟🌞💎✨🌟🌞
Thank you for visiting the blog today & don't forget to hop along with us & leave comments for chances to win prizes!
Crafty Hugs!

Friday, June 26, 2020

June 2020 Sparkle Blends Release Inspiration Blog Hop


Its time for the June
Sparkle Blends Release Inspiration Hop! 

Together with the rest of the Design Team, I will be showcasing the 7 new Sparkle Blends from this month’s release! We’ve got everything from 80’s Neon to a glow in the dark alien blend in this release, so if you haven’t see them yet, make sure you hop over to the Sparkle Blends Shop and check out Broken Glass, Extraterrestrial, I Love the 80’s, Pawsome Pals, She Sells Seashells, Stars & Stripes and You’re Pand-tastic! If you act quickly, there even a couple of discounted release bundles left for order!

Want a chance to win one of 3 fantastic prize packs, each valued at approximately $15.00?

Make sure you leave comments as you hop & you’ll earn one entry for each blog post you comment on! See the Doodles Paper Playground Hop Post for giveaway prizes and entry details. Comments must be posted no later than 11:59pm EST on Sunday, June 28th, 2020 to be eligible to win. Open to US residents only who are at least 18 years old. Winners will be drawn Monday, June 29th & posted on the Doodles Paper Playground blog, Facebook page and in the Sparkle Blends Fan Club on FB.

Who loves Blog Candy??

We’ve got something SWEET in the form of a Discount Code worth 15% off your total order in the shop!

Use Coupon Code: JUNE15OFF 
(Excludes June Release Bundle. Can not be combined with other coupons or offers. Can not be applied to previous Purchases. Valid June 26th through June 30th, 2020)

✨💎✨💎✨💎✨💎✨💎✨💎✨💎✨💎✨


Please hop along with us!


                   Amber  <--You Are Here

✨💎✨💎✨💎✨💎✨💎✨💎✨💎✨💎✨

I have a really fun Inlaid Frame Shaker Card to share with you today, featuring the new & super adorable You're Pand-tastic blend!


I knew I needed to use You're Pand-tastic for my card today! I can't get enough of those cute little panda heads in there! I love how the black and white contrasted with my monochromatic card!


I started by cutting that beautiful Leaf Frame die by Paper Smooches (which is sold out--but you can get a similar look with the Feather Frame die. Don't wait, Paper Smooches is closing its doors for retirement!) from Hero Arts Hero Hues cardstock in Palm! Then I selected a perfect tropical leaves patterned paper from the Doodlebug Designs At The Zoo paper pack and cut my window from a 4 x 5.5 inch panel using the same frame die, centering it as best I could. I grabbed a sheet of green fun foam and cut two pieces just a little bit smaller than my card front. I layered them together using double sided tape and then die cut my window from the center. Finally, I selected a scrap of green tie dye paper from my stash as my background.


To assemble my shaker, I added a piece of Hero Arts Acetate to the back of the card front & inlaid the leaf frame with EK Success 2 Way Glue Pen. I flipped the panel over and used double sided tape, again, to adhere my die cut fun foam to the back, careful to line it up with the window opening. I added a generous amount of You're Pandtastic Sparkle Blends and then closed up the shaker with the green tie die paper, using double sided tape to adhere. I added more tape to the back and adhered the shaker panel to the center of a white, 110#, top folding, landscape card base & set it aside.


For my cute panda cheerleaders, I stamped images from the Clearly Besotted Three Cheers mini stamp set (retired) using My Favorite Things Extreme Black ink. I colored them to match the green in the Leaf Frame with Nuvo Creative Pens Organic Greens & Stormy Greys sets. I adhered them in a cute triangular formation around the frame, like they were doing an adorable cheer routine! Finally, I stamped that punny panda sentiment from the Whimsy Stamps Panda Hair Don't Care stamp set (retired) on a banner of white cardstock and adhered it to the top left corner of the card.


I love the beautiful shades of green in this card and how the neutral black and white of the pandas and Sparkle Blend really stand out!

✨💎✨💎✨💎✨💎✨💎✨💎✨💎✨💎✨

I hope you enjoyed my card today! I really had fun putting it together! Make sure you check out the other amazing projects in this hop and leave some comment love for our designers for chances to win our 3 fantastic prizes!

Have a Craft-tacular Day,
Amber

Saturday, May 30, 2020

Coffee is Cool with a Friend for the 2020 Spring/Summer Coffee Lovers Blog Hop

True to form, I am sliding in just under the wire with this wintry shaker for the 2020 Spring/Summer Coffee Lovers Blog Hop!

I won't lie, this one took me a little while to get around to. As I perused my collection of coffee themed stamps and dies, my mind kept wanting to make neutral, brown, coffee colored cards--but I knew I wanted to experiment with some color! That's when I remembered I had recently bought the MFT Stamps Sweater Weather on Safari stamp set & knew it would be a perfect partner for the Doodles Paper Playground Happy Little Flurries Sparkle Blends


I pulled out my trusty Double Stitched In & Out Cut Rectangle die set by Gina Marie Designs & used the second largest die to cut a frame from a 4 1/4 x 5 1/2 inch panel of sky blue paper with white polka-dots. I cut an A2 panel of acetate and adhered it to the back of the frame with double sided tape. I cut a background of lavender snowflake paper from the Scrapberry Elegantly Festive to perfectly fit a side folding A2, white card base & mounted it with double sided tape. Next, I cut my 3mm foam mounting tape in half, lengthwise & ran it along all 4 edges of the card base. I added a generous amount of Happy Little Flurries Sparkle Blends & added my acetate and frame to close up the shaker box.


Next I stamped out the zebra and giraffe images from the MFT Stamps Sweater Weather on Safari stamp set with MFT Extreme Black Ink. I colored them using my Nuvo Creative Pens to match the colors in the sequin mix & fussy cut them, leaving a small white border. I adhered them to the bottom corners of the card front using 1mm foam mounting tape. Finally, I stamped the sentiment "I'm thankful for a friend like you" & little coffee bean image in Versafine Clair Nocturne ink on a strip of white cardstock. Finally, I cut fish tails on either end of the sentiment strip & adhered it, centered above the colored images with 1mm foam mounting tape. 


Thank you for visiting my blog today, I hope you liked my project & that you made your own coffee card to link up to the Coffee Lovers Blog Hop! Have a great day!

Crafty Hugs,
Amber

Friday, May 15, 2020

May 2020 Sparkle Blends Release Blog Hop


Hello Sparkle Blends Fans! Its time for our May Release Blog Hop! We’ve got a fantastic lineup of Blends this month & the design team & I have created some awesome inspiration projects featuring some of the 7 new Sparkle Blends in this release! As if that weren’t enough, we are offering you the chance to win 3 fantastic prize bundles!

See the Doodles Paper Playground Hop Post for giveaway prizes and entry details. Comments must be posted no later than 11:59pm EST on Sunday, May 17th, 2020 to be eligible to win. Open to US residents only who are at least 18 years old. Winners will be drawn Monday, February 18th & posted on the Doodles Paper Playground blog, Facebook page and in the Sparkle Blends Fan Club on Facebook.

As an added bonus, we’re offering you a little bit of Blog Candy, in the form of a Discount Code worth 15% off your total order!

No Coupon Code Necessary. Sale applied automatically.
(Excludes May Release Bundle. Valid through May 18th, 2020. May not be combined with other coupons or offers.)


✨💎✨💎✨💎✨💎✨💎✨💎✨💎✨💎✨

Hop along with us!


                         Amber <--You are here


✨💎✨💎✨💎✨💎✨💎✨💎✨💎✨💎✨

I've got an adorable shaker card to share with you today featuring a combination of Spill The Bubble Tea & Monkey Business Sparkle Blends from the May release! I don't often craft with much yellow, so I wanted to challenge myself a little bit to use it this time--plus, I couldn't resist trying out the new Mama Elephant Boba Tea stamp with the monkey on it, Little Agenda Monkeys & Boba Shaker Combo die sets together! 


I started by cutting a layer of solid yellow cardstock to 4 x 5 1/4 inches and a piece of Craft Perfect by Tonic Powder Blue Lace embossed cardstock to 3 7/8 x 5 1/8 inches & layered them in the center of a White 110# A2 sized, side folding card base with double sided tape. 

Next I die cut the pieces to create that adorable Boba shaker! I cut the background panel from the same yellow cardstock I layered for the background & then cut 12 of the shaker frame pieces from 110# Recollections cardstock. (this was overkill--you could get away with 8-10 and still have plenty of shake to your shaker!) Before cutting the final piece, I added double sided adhesive to the top side of the cardstock so it would be easy to adhere my acetate. I used the back panel to cut a perfectly sized piece of acetate & also die cut the cup cover from acetate. Then cut the top frame out of Petallics Pearl cardstock with double sided adhesive sheet on the back. I wanted it to match the back panel, so I colored it with my Lemon Drops #401 Nuvo Creative Pen. I love doing this because you get to keep the shimmer finish of the Petallics cardstock, but I can make it match my project perfectly! I also die cut the straw & whipped cream from the set out of Pearl Petallics cardstock.

I assembled the Shaker box using EK Success Two Way Glue pen for the yellow back panel & plain white layers, sliding the straw between the top two layers & gluing it down, too. Then I added some Spill The Bubble Tea & Monkey Business Sparkle Blends--just enough so it would fill the shaker about half way when upright. I peeled the backing off of the double sided adhesive on the top shaker box layer & adhered my die cut acetate over that. I added the colored Petallics frame to complete the cup base before adding the whipped cream and clear cup cover using Ranger Multi Medium Matte to finish up my cute little shaker.


I knew I wanted to use the Monkey Boba Cup from the Boba stamp set & the cute banana peeling monkey from the Monkey Agenda set, so I stamped them on Recollections 65# cardstock using MFT Extreme Black hybrid ink before coloring them with my Nuvo Creative Pens. I fussy cut them with my gold Cut-Up X-Fine Tip 5.5in scissors before adhering the boba cup image with 1mm foam mounting tape & the shaker with Ranger Multi Medium Matte at a cute, jaunty angle to each other. I think it makes the card match the playful monkeys. 


I love the cute, punny sentmients in the Mama Elephant Boba Tea stamp set, and slected "You're the boba to my milk tea" for this card. I cut a 5/8 inch wide strip of 110# Recollections cardstock & a strip of the yellow cardstock that matches the other yellow elements that was 3/4 inches wide. I stamped the sentiment on the white strip and cut the right end in a flag shape. I mounted the sentiment flag on the yellow card stock and then cut the flag shape to leave a border all the way around. I mounted the flag to my card with Multi Medium Matte and then glued on one of the adorable larger size Boba Cup shapes from Spill The Bubble Tea and a few sequins as embellishment before calling this card complete.


✨💎✨💎✨💎✨💎✨💎✨💎✨💎✨💎✨

Thank you so much for visiting my blog today! 
I hope you've enjoyed the hop, so far! Make sure you check out all the other stops for more chances to win prize packs!

Crafty Hugs,
Amber

Friday, April 24, 2020

Craft It Forward 2020 Kids Card Kit Tutorial: Volume 2 - Farm


Hello Parent Friends!

This is the second installment of Kid Card Kits. This round's theme is Farm (I know that for some parents, this is the first kit your kids have received, but its actually the second round I've sent out 😊). This time, I've decided to give two different idea options of how the kit can be assembled, which I think will be fun for families with multiple children--OR, you can come up with your own design! If you do, I'd love to see a photo!


I do want to apologize for the long delay in getting these kits mailed. We have had a trying couple of weeks with the kids as well as my sister having her final exams for her 2nd term of Nursing School & the kits had to be put on the back burner--I'm sure you all understand. We're all in this together! 

Again, feel free to PM me on Facebook if you have any questions about the photo tutorial. I'm happy to help!

I would love it if your kiddos sent their creations on to a loved one who might need some cheering up, so I've included envelopes with cute stamped critters for them to color!

HAVE FUN!

✄✄✄✄✄✄✄✄✄✄✄✄✀

Hello (again) New Card Maker!
I have created a Farm Themed card kit for you to assemble! Enjoy your crafty time!

KIT CONTENTS:

1- White Envelope with coordinating stamped design (for coloring!)

1- 4 1/4 x 5 1/2 inch White Card Base with stamped sentiment inside.


1- 3 7/8 x 5 1/8 inch patterned background paper rectangle

1 - 2 1/4 x 3 1/2 inch patterned rectangle

1 - 1 1/4 x 5 1/8 inch patterned rectangle strip

1 - skinny patterned paper strip

1 - die cut farm animal or image rectangle

1 - die cut sentiment bubble or strip

3 - self adhesive solid color, bumpy rhinestones (one of 3 colors: Blue, Yellow or Purple)

You Will Need: Crayons, Colored Pencils or Water Based Markers (not provided)


Note: All pieces intended to be adhered already have double sided tape or foam mounting tape on the back. All you have to do is peel and stick! Easy Peasy!

INSTRUCTIONS:

Step 1:
Select the Background panel (3 7/8 x 5 1/8 inch patterned rectangle) and flip it over. You will see 3 pieces of double sided tape. Completely remove the one in the middle & discard the backing strip. Peel the first 1/3 of the backing paper off the other two strips of double sided tape, starting from opposite corners. Fold the backing strips at a 90 degree angle, outside of the paper as shown below.


Step 2:

Grab your card base (open it to make sure its right side up and the sentiment is in the right spot)


Next, flip over your background panel onto the front of the white card base. Line it up so its as close to the center as you can. When you get it where you want it, press down on only the center to adhere the uncovered tape strip, like this.


Step 3:

 Using one hand to make sure your background doesn't move, grab the "tail" of the tape backing paper with your other hand and gently peel in the direction of the fold (I find that doing this toward me is the easiest way). Repeat on the other side. Press down your panel to make sure all three tape strips stick well.


Step 5:

Grab your the tall, skinny patterned strip (1 1/4 x 5 1/8 inch) & Using the same peel and fold technique, prepare the tape so it looks like the photo below, making sure there is only exposed adhesive on the top edge.


Step 6:

Grab your card base (again, checking to make sure it's right side up) and flip the strip over, lining it up with the top center of the background layer. When you have it where you want it, press down gently on the edge with exposed adhesive to tack it down, then you should be able to adjust the angle so the strip runs vertically (the up and down way) up the center of the card, as straight as you can get it. It should look like this.


Step 7:
Use one hand to hold the strip in place and the other to grab the "tails" of the tape backing strips again and gently peel in the direction of the fold, just like in the last step. 
Once both backing paper strips have been removed, firmly press the strip down to make sure it sticks well.

Step 8:
Grab the smaller patterned paper rectangle (2 1/4 x 3 1/2 inches). Again, flip it over and prepare the tape at the back with the "peel & fold" techinique, just like with the first background panel, leaving tape exposed in two opposite corners, like this.


Step 9:
Flip the rectangle over and place it as close to the center of the card panel as you can. When you get it where you want it, press down in the center to adhere the exposed tape strip, then gently remove the backing strips, once again & press down firmly to make sure it sticks well.


Step 10:
Take the skinny patterned paper strip & peel the backing off one end, using the same folding technique. Place the strip horizontally (side to side) in the center of the panel, lining the sticky end up with the very edge of the background panel. Press down gently on that edge to tack it down, then line up the other edge before gently peeling off the backing paper and pressing firmly to adhere the strip, like this.


Step 11:
Grab your die cut Animal image or small Rectangle Image Panel. You will find foam tape on the back of this piece. 
Flip the image over and completely peel the backing paper off. Turn the image over and place it in the center of the card panel. Press down firmly.
Your card should look something like this.

Note: I cut my image in half because I didn't like the way it fit the card when full size. 

Step 12:
Next, you'll need the sentiment strip or bubble. This will also have foam tape on the back. Peel off the entire backing strip and adhere below the image in the bottom 1/4 of the card, as straight and centered as you can get it. Press firmly to stick it down. Your card should look something like this.


Step 13:
Its time to give your card a little sparkle! Grab the 3 colored rhinestones & place them however you would like. I suggest  putting them in a vertical line, about 1/8 inch apart, in the top right corner of your card, like this. 


Step 14:
Last step! Grab the envelope and some colored pencils, crayons or markers & color the cute little goat or sheep in the bottom left corner! If you want to get extra fancy, you can draw a little grassy hill underneath him to "ground" the image, like this!


You're finished! Look how great your card turned out!
Who do you think you should send it to? 
Does someone you know need an extra smile?
Why don't you ask your mom or dad to help you address your envelope and mail it out to someone special!

✄✄✄✄✄✄✄✄✄✄✄✄✀

BONUS DESIGN!

Step 1:

Select the Background panel (3 7/8 x 5 1/8 inch patterned rectangle) and flip it over. You will see 3 pieces of double sided tape. Completely remove the one in the middle & discard the backing strip. Peel the first 1/3 of the backing paper off the other two strips of double sided tape, starting from opposite corners. Fold the backing strips at a 90 degree angle, outside of the paper as shown below.


Step 2:

Grab your card base (open it to make sure its right side up and the sentiment is in the right spot)


Next, flip over your background panel onto the front of the white card base. Line it up so its as close to the center as you can. When you get it where you want it, press down on only the center to adhere the uncovered tape strip, like this.


Step 3:

 Using one hand to make sure your background doesn't move, grab the "tail" of the tape backing paper with your other hand and gently peel in the direction of the fold (I find that doing this toward me is the easiest way). Repeat on the other side. Press down your panel to make sure all three tape strips stick well. It should look like the 2nd picture.


Step 5:

Grab your the tall, skinny patterned strip (1 1/4 x 5 1/8 inch) & Using the same peel and fold technique, prepare the tape so it looks like the photo below, making sure there is only exposed adhesive on the top edge.


Step 6:

Flip over the strip and line up the sticky part of the tape in the top left corner of the background paper, carefully lining it up with the left edge. Press down on the top edge & then carefully remove the backing papers, one at a time. Press firmly to adhere.


Step 7:


Grab the skinny patterned strip, and peel the backing paper off one end & fold the tail. Now, flip it over and place it along the inner edge of the edge strip, centered vertically (up and down). Press down the exposed tape & gently remove the rest of the backing paper before pressing firmly to adhere well. Your card should look something like this.


Step 8:
Grab the smaller patterned paper rectangle (2 1/4 x 3 1/2 inches). Again, flip it over and prepare the tape at the back with the "peel & fold" techinique, just like with the first background panel, leaving tape exposed in two opposite corners, like this.


Step 9:
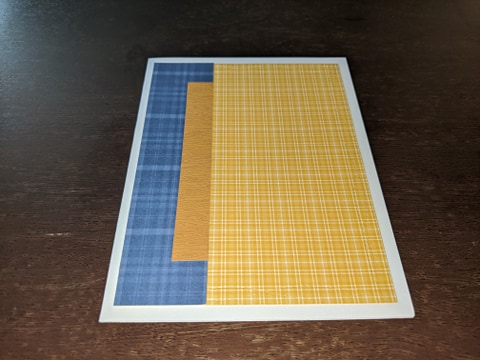
Flip the rectangle over and place it as close to the center of your card as you can get it, making sure to leave some of the skinny strip visible along the left side. Press down in the center and then carefully peel off the backing strips. Press firmly to stick well. Your card should now look like this.

Step 10:

Now its time to grab your die cut animal or image rectangle. Flip it over and completely remove the backing from the foam tape. Now place it in the bottom 2/3 of the middle rectangle, centering it horizontally (side to side), like this.


Step 11:

Its time to add the sentiment! Turn over the sentiment strip or bubble & peel the backing off the foam tape. Turn it back over and place it above your image, overlapping the corner of the smaller rectangle, offset to the right, like this.


Step 12:

We need some bling on our cards, don't we? Take your 3 colored rhinestones & put them wherever you want! I suggest placing them in a vertical line (up & down), about 1/8 inch apart in the top left corner, creating a visual triangle with our embellishments (image, sentiment, jewels), which is pleasing to the eye, like this.


Step 13:

Last but not least, grab your envelope & your choice of colored pencils, crayons or markers & color in the little goat or sheep in the bottom corner. If you want to make it look like a little scene, you can add a grassy hill beneath your critter, like this.


You're all done & you made an awesome card! Congratulations! Time to have Mom or Dad help you address the envelope & mail it to someone special! 
Who do you think you're going to mail your card to?

✄✄✄✄✄✄✄✄✄✄✄✄✀

Thank you for joining me for


I hope you had fun putting your card together!

I may do another round of card kits, if I do, I'll contact your parents and let them know :-)

Crafty Hugs,
Amber

✄✄✄✄✄✄✄✄✄✄✄✄✀

Important Info:

The latest information I've been able to find from the CDC is that Covid-19 survives on cardboard for up to 24 hours, but may survive on some paper surfaces for as little as a few minutes or as long as 5 days, depending on the strain. By the time cards arrive at the recipient's homes, they should be safe to open, but I would suggest telling high risk recipients to leave them somewhere isolated for at least 48 hours before opening, just to be safe, or at the very least, handle them with an abundance of caution & wash hands after opening or handling them.

Disclaimer: 
At this time, everyone in our household appears healthy and has had no known exposure to the virus. 


All but one of us has been practicing Shelter In Place, voluntarily since the 10th of March & My husband, who is still working outside the home, works in a VT state building with a skeleton crew, but has been distancing himself from the rest of the family when he's home, just to be safe. We also clean and disinfect surfaces at least daily and wash fabric items often, as an added measure.